ADVERTISEMENT
How to Whiten Yellowed Plastic on Devices: A Detailed Guide
Plastic devices and accessories surround us in daily life — from keyboards, game consoles, and phone chargers to household appliance casings and retro electronics. Over time, many of these items develop an unwelcome golden hue. While some people find this “vintage patina” charming, most of us want our gadgets to look crisp and white again.
This comprehensive guide dives into why plastics yellow, what works (and what doesn’t), and how to safely restore yellowed plastic to near-original whiteness — using household methods and more advanced techniques.
Why Plastic Turns Yellow
Before treating yellowing, it helps to understand what causes it.
- UV Exposure (Sunlight & Indoor Light)
Most plastics used in consumer electronics contain chemicals that degrade under ultraviolet (UV) light. Sun exposure accelerates this process. Even indoor lighting can do this over years.
- Oxidation
Plastic components — especially ABS (Acrylonitrile Butadiene Styrene) — oxidize when exposed to air. This chemical reaction darkens the plastic and makes it look yellow.
- Heat
Prolonged heat can alter plastic at a molecular level. Devices that get hot during use (routers, vintage game consoles) may show yellowing from repeated thermal stress.
- Chemical Exposure
Oils from hands, cleaning solvents, cigarette smoke, and even cooking oils can react with plastic surfaces and accelerate yellowing.
- Manufacturing Additives
Some plastics contain flame retardants or other additives that can discolor more easily with time.
Understanding the causes helps you choose the best restoration method — and prevents future yellowing.
Safety First: Before You Begin
⚠️ Always Consider:
Power safety: Never apply liquids or chemicals to plugged-in electronics.
Ventilation: Work in a well-ventilated area, especially with peroxide or chemical solutions.
Protective gear: Wear gloves and eye protection if you’re handling lotions of chemicals like hydrogen peroxide.
Test first: Always test any method on a small, inconspicuous area first.
Some vintage plastics are brittle. Over-scrubbing or harsh chemicals may break or damage them.
Step-by-Step Methods to Whiten Yellowed Plastic
We’ll start with gentle, household methods and progress to stronger techniques.
- Cleaning First: Remove Surface Grime
Before whitening, eliminate dirt and oils — often responsible for much of the discoloration.
What You’ll Need
Mild dish soap
Warm water
Soft cloth or sponge
Old toothbrush
Q-tips
Steps
Unplug the device and remove batteries.
Mix warm water + a few drops of dish soap.
Dip a sponge and gently scrub the surface.
Use a toothbrush or Q-tips for crevices.
Rinse with a damp cloth.
Dry completely with a soft towel.
Why it matters: Removing oils and surface dirt allows whitening agents to penetrate better.
- Baking Soda Paste: Mild Abrasive Cleaning
A gentle abrasive, baking soda helps lift yellowing when cleaning alone isn’t enough.
Materials
Baking soda
Water
Soft cloth
Steps
Mix baking soda + a bit of water to make a mild paste.
Apply to yellowed areas and rub gently.
Wait 5–10 minutes.
Rinse and dry.
Pro tip: This works well on lightly yellowed plastics and may help even after peroxide treatments to brighten further.
- Lemon & Sunlight Method
Vitamin C (citric acid) from lemon juice combined with UV light can help break down discoloration.
Materials
Fresh lemon juice (or bottled)
Spray bottle
Sunlight exposure
Steps
Spray lemon juice generously on plastic surface.
Place item in direct sunlight for 1–3 hours.
Rinse and dry.
Note: This method is best for mild cases and when you want a natural, chemical-free approach.
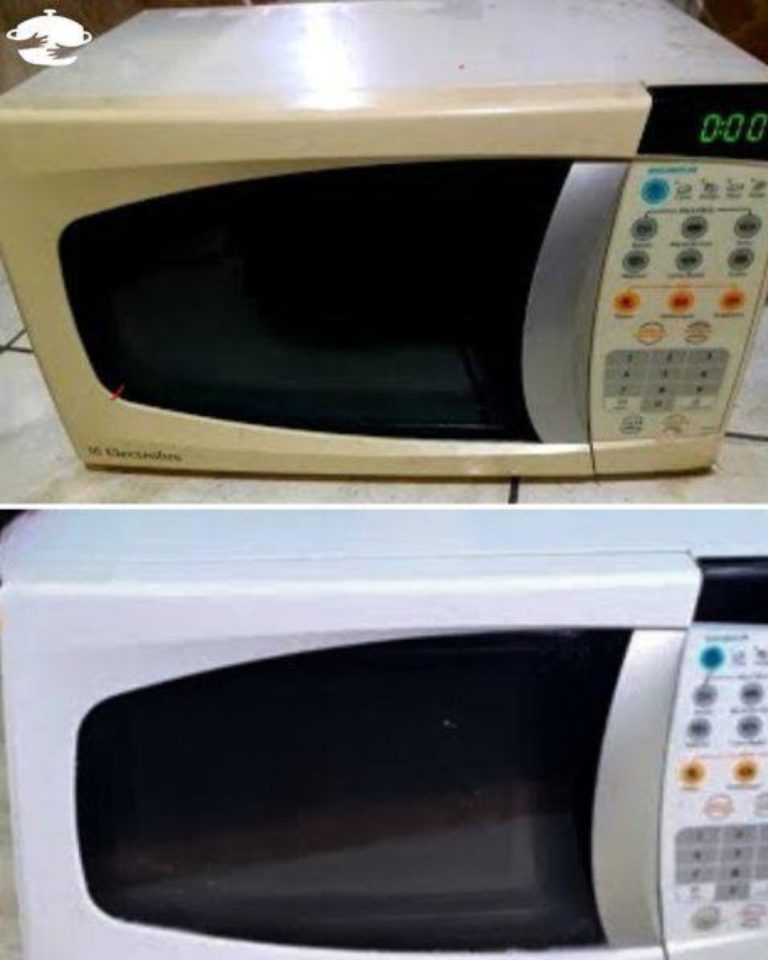
- Hydrogen Peroxide (Peroxide Bath) — The Classic Retrobright Method
For many DIY restorers, this is the go-to procedure for yellowed ABS plastic. It uses hydrogen peroxide to reverse discoloration through a process similar to bleaching.
You’ll Need
Hydrogen peroxide (3% household strength, or ideally 10–12% from beauty supply)
Plastic wrap (cling film)
Small bowl or container
Paintbrush or cloth
UV light source or sunlight
Step-by-Step: Retrobright Treatment
Note: This method works best on removable plastic parts — not entire assembled electronics.
- Remove the Plastic Parts
Take off the casing or panels you want to treat. If the item is hardwired, skip to a method below that doesn’t use liquids.
- Clean Thoroughly
As in method 1 above — remove all surface grime.
- Apply Hydrogen Peroxide
Use a brush to coat yellowed areas.
- Wrap in Plastic Wrap
Seal the peroxide so it doesn’t evaporate. This creates a mini green-house.
- Expose to Sunlight or UV Lamp
Place wrapped pieces in sunlight or under a UV lamp for 2–8 hours.
- Check Progress
Unwrap and inspect. Repeat if needed — up to a few sessions.
- Rinse & Dry
After whitening, wash off peroxide and dry completely.
Safety Tips for Peroxide Whitening
Use gloves and avoid contact with skin.
Do not use on acrylic windows/screens — it can haze them.
Avoid high concentrations on plastics not meant for bleaching; test always.
- DIY UV Box Method (Indoor Alternative)
If sunlight isn’t available, you can build a UV box:
You’ll Need
UV nail-curing lamp or blacklight bulbs
Clear plastic tote
Support racks inside the tote
Steps
Mount UV source above the tote lid.
Place parts inside on racks.
Apply peroxide, wrap lightly.
Run UV light for 3–6 hours.
Why it works: UV activates the peroxide similar to sunlight, making it effective indoors.
- Commercial Plastic Restorers
There are store-bought plastic whitening kits that combine proprietary blends of gels and UV activation. These often include:
Gel with peroxide
Applicator brush
Instructions
They tend to cost more, but can be more controlled than DIY peroxide.
- Magic Erasers & Melamine Foam
For light yellowing and surface stains, melamine foam (like Mr. Clean Magic Eraser) can help.
How to Use
Dampen the foam
Gently rub the surface
Caution: These are mild abrasives — don’t over-scrub or use on delicate areas.
- Sanding & Repainting (Advanced Cosmetic Fix)
When whitening alone won’t bring back original brightness — especially with deep discoloration — you can sand and repaint.
Tools
Fine grit sandpaper (400–800 grit)
Plastic primer
Plastic-safe paint (spray)
Clear coat
Steps
Sand the surface lightly until smooth and dull.
Clean dust completely.
Apply primer coat.
Spray light coats of paint.
Finish with clear coat for protection.
This method is more artistic and should be a last resort when bleaching doesn’t achieve desired results.
- Professional Restoration Services
If the device is valuable or vintage, consider professional restoration. Experts can:
Refinish plastics
Replace parts
Preserve original finish with museum-grade chemicals
This avoids DIY mistakes that can reduce value.
- Prevent Future Yellowing
Once your device is white again, keep it that way with these habits:
Block UV Light
Keep electronics out of prolonged sunlight
Use UV-blocking window film or curtains
Dust & Clean Regularly
Dirt and oils accelerate discoloration.
Maintain Cool Temperatures
Avoid placing devices near heat sources.
Use Protective Covers
For controllers, keyboards, chargers — covers help reduce air and light exposure.
Troubleshooting: What If It Doesn’t Work?
❓ Plastic Still Yellow?
The material may be heavily oxidized and porous.
Consider repeating peroxide treatment with longer UV exposure.
❓ Surface Looks Patchy or Uneven?
For Complete Cooking STEPS Please Head On Over To Next Page Or Open button (>) and don’t forget to SHARE with your Facebook friends
ADVERTISEMENT
